A good sandwich press turns leftover bread, cheese and a winter night into a $2 toastie. Three AU-verified picks from ~$44 to ~$125 — the press-vs-jaffle difference explained.
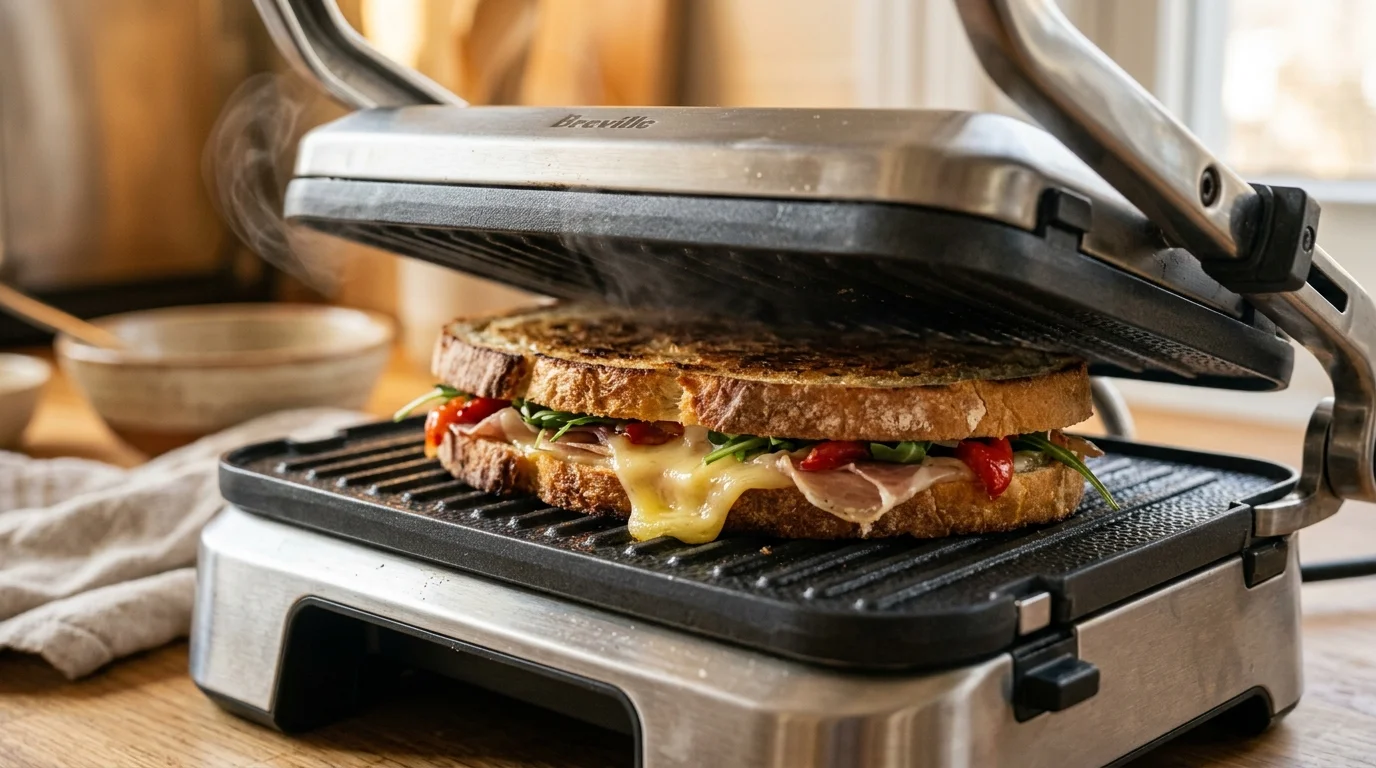
It's the middle of a Melbourne winter, it's dark by 5pm, and the last thing anyone wants to do is cook a proper dinner. This is exactly the moment a sandwich press earns its bench space: two slices of bread, a handful of grated cheese, maybe some leftover roast chook or a slice of ham, and four minutes later you've got a golden, crunchy toastie for under $2. It's the comfort food the cold months were made for — and a sandwich press does it better, faster and with less washing-up than a frypan or a grill.
A sandwich press is one of the cheapest, most-used appliances you can put on an Australian benchtop. Unlike a slow cooker that you plan a meal around, a press is grab-and-go: breakfast jaffles, lunch melts, a quick panini, reheating last night's pizza so the base actually crisps. We've researched the sandwich presses genuinely worth buying in Australia for 2026 — from a $44 budget workhorse to a family-sized 4-slice — and explained the one distinction most buyers get wrong before they even start shopping.

Sandwich press vs jaffle iron vs toaster — get this right first
These three appliances get lumped together, but they make completely different food. Buying the wrong one is the single most common sandwich-press mistake, so here's the plain-English version before you spend a cent.
- A sandwich press has two flat or ribbed heated plates with a floating top hinge that comes down and presses your sandwich flat. Think paninis, cheese melts, flat toasties, quesadillas, grilled veg, halloumi, and crisping up leftover pizza. The fillings stay where you put them; the edges stay open. This is what this whole guide is about.
- A jaffle iron (or pie maker) has sealed, scalloped pockets that crimp and seal the bread edges shut, trapping a molten filling inside — the classic sealed jaffle that explodes with hot baked beans or apple. It's a different food entirely. A sandwich press cannot make a sealed jaffle, and a jaffle iron can't press a flat panini.
- A flat toaster just browns plain bread slices — no fillings, no pressing. Great for a slice of Vegemite toast; useless for a cheese melt. If that's all you want, see our best toaster guide instead.
In Australian kitchen vernacular "toastie" usually means the flat, pressed kind that comes out of a sandwich press, while "jaffle" strictly means the sealed, crimped pocket kind — though plenty of people use the words interchangeably. If you want sealed jaffles, stop here and buy a jaffle iron. If you want flat, melty, café-style toasties and paninis, read on — a press is your appliance.
What a sandwich press is brilliant at (and what it isn't)
A press is one of the most versatile cheap appliances in the kitchen. Once you have one, you'll use it for far more than ham-and-cheese:
- Toasties and melts — the core job. Cheese, ham, tomato, chutney; tuna melts; the leftover-roast toastie that turns Sunday's dinner into Monday's lunch.
- Paninis and Turkish bread — the floating hinge handles thick, crusty bread that a toaster can't fit.
- Quesadillas — tortilla, cheese, whatever's in the fridge; the flat plates seal the cheese without sealing the edges.
- Grilled veg and halloumi — zucchini, eggplant, capsicum, a slab of halloumi; ribbed plates give you char-grill marks without firing up the BBQ in winter.
- Reheating pizza — the one trick everyone discovers: a press crisps the base instead of going soggy like the microwave does.
What it's not: a sandwich press is not a full contact grill for thick steaks or chops — the floating hinge and plate wattage are tuned for sandwiches, not searing a 3cm porterhouse. It handles paninis, halloumi and thin grilled veg happily, but for serious grilling you want a dedicated contact grill or the BBQ. And, again, it does not make sealed jaffles. Know those two limits and a press will outperform almost any appliance for the price.
Flat plates vs ribbed (grill) plates
The plate surface changes both the look and the job:
- Flat plates give you full, even contact across the whole sandwich. That means the most even melt, the crispiest full-surface toastie, and the easiest cleaning — there are no grooves for cheese to weld itself into. Flat plates are the right default for classic toasties and melts, which is why both Breville Toast & Melt models and the Russell Hobbs budget pick use flat plates.
- Ribbed (grill) plates stamp char-grill lines across the food — that café-panini look, and the visual cue people associate with a "proper" grilled sandwich. They're better for halloumi, grilled veg and paninis where you want the marks and a bit of fat to drain into the grooves. The trade-off: slightly less even melting (the ridges only touch part of the bread) and more fiddly cleaning.
Some presses offer reversible or interchangeable flat/ribbed plates so you get both, but for most Australian households a quality flat-plate press is the more useful single appliance — it does melts perfectly and still handles a panini fine. Buy ribbed only if the grill marks genuinely matter to you.
The floating, height-adjustable hinge — the spec that actually matters
If you only check one thing before buying, make it the hinge. A cheap press has a top plate on a fixed pivot: load a thick sandwich and the front edge crushes the filling out the sides while the back stays raw, or vice versa. A good press has a floating hinge that lets the top plate stay parallel as it rises to meet whatever thickness you've loaded — so a fat panini and a single slice of cheese both get even contact top-to-bottom.
Better presses add height adjustment on top of the float: you set a maximum height, and the top plate presses down to that point but no further. That's the difference between a sandwich that's pressed and one that's squashed — you compress the bread enough to seal and crisp it, without flattening a generous toastie into a cracker. The Breville Toast & Melt models are the AU benchmark here precisely because their floating top plate self-levels and the height dial stops over-compression. The budget Russell Hobbs has a floating hinge and lid lock too, which is why it punches above its price; it just doesn't give you the same fine height control.
Non-stick and removable/dishwasher-safe plates — the cleaning reality
Cleaning is the number-one thing people complain about with sandwich presses, and it comes down to the plates. Melted cheese and buttery crumbs bake onto a hot surface fast, so two features decide how much you'll dread the cleanup:
- Quality non-stick coating — a good PFOA-free non-stick (the Breville models use a titanium-reinforced coating) means a wipe with a damp cloth once the plates have cooled usually does it. Cheaper coatings wear through after a couple of years of metal-utensil abuse, so always use a wooden or silicone tool to lift your toastie, never a knife.
- Removable / dishwasher-safe plates — the gold standard. If the plates pop out and go in the dishwasher, the worst cleaning job becomes a non-event. Most fixed-plate presses (including these picks) instead rely on you wiping the plates while still slightly warm and never submerging the body — perfectly manageable, just less hands-off than removable plates.
A drip channel or grease tray is the other cleaning helper: it catches the fat and melted cheese that escapes a panini so it doesn't pool on your bench. Wipe the plates after every use while warm (never when cold and set) and a press stays good for years.
2-slice vs 4-slice — who needs which
Capacity is the main fork in the road once you've picked a brand:
- 2-slice presses make one large sandwich, or two if they're small — right for singles, couples, and anyone with limited bench space. It's the most common choice and the size most Australian kitchens have. The Breville Toast & Melt 2-Slice and the Russell Hobbs both sit here.
- 4-slice presses do two full toasties (or four slices' worth) in one go — the family pick, or for anyone who hates doing toasties in shifts. If you're feeding kids on a winter weekend or making batch lunches, the 4-slice Breville saves you the second round. The cost is a bigger footprint on the bench and in the cupboard.
If you cook for one or two, the 2-slice is plenty and stores more easily on its side. If toasties are a regular family event, the jump to a 4-slice is worth it just to feed everyone at once.

Power and heat-up speed
Most sandwich presses sit between roughly 700W and 2100W. Higher wattage mainly buys you faster heat-up and quicker recovery between batches — handy if you're making toasties back-to-back on a busy morning. The budget Russell Hobbs is a punchy 2100W and heats up notably fast, which is a genuine selling point at its price. The Breville models prioritise even, well-distributed heat across the plates over a single headline wattage number, which is what gives you a uniform golden colour edge-to-edge rather than a hot spot in the middle.
One small quirk worth knowing: most sandwich presses — including these picks — have no on/off switch. They start heating the moment they're plugged in and run on a thermostat, so you switch them off at the wall and unplug when done. It's not a fault, just how the category works.
Our three picks in detail
Best budget — Russell Hobbs Sandwich Press (RHSP801BLK), ~$44
The no-fuss value workhorse. At around $44 the Russell Hobbs gives you a 2100W element for fast heat-up, non-stick flat plates, a floating hinge that adjusts to varied sandwich thickness, and a lid lock so it stores upright to save space. It won Canstar Blue's 2026 award for sandwich-press customer satisfaction, which tells you Australian owners are genuinely happy with it. It doesn't have the fine height-control dial of the Breville, and the build is lighter, but for a sharehouse, a rental, or a first kitchen it does the core job — crispy, even toasties — for roughly half the price of the benchmark. If you're not sure you'll use a press often enough to justify a premium one, start here.
Best for most — Breville the Toast & Melt 2-Slice, ~$72
This is the sandwich press most Australian kitchens already own, and the one we'd point most buyers to. At around $72 the Toast & Melt's floating top plate self-levels to whatever you load and the height dial stops it over-compressing, so thick paninis and single-slice melts both get even contact. The deep-fill flat plates and titanium-reinforced non-stick coating deliver a café-grade, edge-to-edge golden toastie and wipe clean easily. Brushed-stainless build, upright side-storage, and a reputation for lasting many years of daily use. It's not the cheapest, and there's no separate thermostat dial, but for the combination of even results, build quality and resale-grade durability it's the AU default for a reason. Pair it with a quality kettle and you've covered the two appliances a winter breakfast actually needs.
Premium / family — Breville the Toast & Melt 4-Slice, ~$125
The same proven Toast & Melt design scaled to four slices. At around $125 you get the identical floating hinge, height adjustment, deep-fill flat plates and titanium-reinforced non-stick — just a wider footprint that presses two full toasties (or four slices' worth) at once. This is the family buy: nobody waits for the second round on a Saturday, and batch winter lunches happen in one go. Owners consistently report years of reliable daily service. The only honest catch is size — it takes up more bench and cupboard space than the 2-slice, so only step up if you'll genuinely use the extra capacity. If it's usually just one or two of you eating, save the money and the bench space with the 2-slice.
How to make a great toastie (the technique most people miss)
A good press does most of the work, but a few habits separate a soggy disappointment from a café-grade toastie:
- Butter the outside, not the inside. A thin layer of butter (or a smear of mayonnaise, which browns beautifully and won't burn) on the outer faces of the bread is what gives you that crisp, golden, even crust. Buttering the inside just makes it greasy.
- Preheat fully before the sandwich goes in. Give the press 3–5 minutes to come up to temperature. A cold plate steams the bread instead of crisping it — the difference between pale and golden.
- Don't overfill. A mountain of filling won't heat through before the bread burns, and it squeezes out the sides into a mess on the plates. Grate cheese rather than slicing it so it melts fast and evenly, and keep the layer modest.
- Let the press do the pressing. Close the lid gently and let the weight and the hinge do the work — don't lean on it, or you'll squash the filling out and dent the bread.
- Rest it for a minute. Molten cheese is lava straight out of the press. A minute's rest also lets the crust set so it stays crisp.
Cleaning and care
Wipe the plates while they're still slightly warm — not screaming hot, not stone cold and set — with a damp cloth or paper towel; warm cheese lifts off in seconds, cold cheese welds on. Never submerge the body of the press in water (the electrics live in there), and never use a metal knife or scourer on the non-stick — a wooden or silicone tool and a soft cloth only. If something's really baked on, lay a damp cloth over the cooled plate for a few minutes to soften it before wiping. Empty the drip tray if your model has one, store the press upright on its side to save space, and the non-stick will last for years. Treat the coating well and a press genuinely outlives most kitchen gadgets.
Where a sandwich press sits in a first-home kitchen
A press is one of those small appliances that earns its place by sheer frequency of use — it's cheaper than a air fryer and gets pulled out almost as often, especially through winter. For around $44 to $125 you get fast weeknight dinners, café-style lunches at home, and a use for every awkward leftover. If you're kitting out a first kitchen from scratch, it belongs on the shortlist right alongside the kettle, the toaster and the slow cooker — see our full kitchen essentials guide for the complete list.
Frequently Asked Questions
What is the best sandwich press in Australia in 2026?
For most Australian households, the Breville the Toast & Melt 2-Slice (~$72) is the best sandwich press in 2026 — its floating, height-adjustable top hinge presses thick fillings flat without squashing, the deep-fill flat plates melt evenly, and it's the AU benchmark for durability. If you want to spend less, the Russell Hobbs Sandwich Press (RHSP801BLK, ~$44) is the budget workhorse and won Canstar Blue's 2026 satisfaction award. For families, the Breville Toast & Melt 4-Slice (~$125) does four slices at once.
What is the difference between a sandwich press and a jaffle iron?
A sandwich press has flat or ribbed heated plates with a floating top hinge that presses a sandwich flat — paninis, melts, flat toasties and quesadillas, with the bread edges left open. A jaffle iron (or pie maker) has sealed, scalloped pockets that crimp and seal the bread edges shut, trapping a molten filling inside — the classic sealed jaffle. They make different food: a press cannot make a sealed jaffle, and a jaffle iron cannot press a flat panini. Choose a press for flat, melty, café-style toasties; choose a jaffle iron for sealed pockets.
Are flat or ribbed plates better for toasties?
Flat plates are better for classic toasties and cheese melts — they give full, even contact for the crispiest, most uniform result, and they're easier to clean because there are no grooves for cheese to stick in. Ribbed (grill) plates stamp char-grill marks across the food and suit halloumi, grilled veg and café-style paninis, but melt slightly less evenly and are fiddlier to clean. For most Australian households a quality flat-plate press is the more useful single appliance.
How do I clean a sandwich press properly?
Wipe the non-stick plates with a damp cloth or paper towel while they're still slightly warm — warm cheese lifts off in seconds, while cold cheese welds on and is far harder to remove. Never submerge the body of the press in water, and never use a metal knife or scourer on the non-stick coating; use a wooden or silicone tool only. For stubborn baked-on bits, lay a damp cloth over the cooled plate for a few minutes to soften them before wiping. Empty the drip tray if your model has one.
Should I buy a 2-slice or 4-slice sandwich press?
Buy a 2-slice press (like the Breville Toast & Melt 2-Slice or the Russell Hobbs) if you cook for one or two people or have limited bench space — it makes one large or two small sandwiches and stores more easily upright. Step up to a 4-slice (like the Breville Toast & Melt 4-Slice, ~$125) if you're feeding a family or making batch lunches, so nobody waits for a second round. The trade-off for the 4-slice is a larger footprint on the bench and in the cupboard.
Can you cook more than toasties in a sandwich press?
Yes — a sandwich press is far more versatile than just ham-and-cheese. It handles paninis and Turkish bread, quesadillas, grilled halloumi and thin grilled veg like zucchini and eggplant, and it's the best way to reheat leftover pizza because it crisps the base instead of going soggy like a microwave. What it is not is a full contact grill for thick steaks or chops — the hinge and wattage are tuned for sandwiches, not searing a 3cm porterhouse.
Do sandwich presses have an on/off switch?
Most sandwich presses — including the Russell Hobbs and both Breville Toast & Melt models — do not have a separate on/off button. They start heating the moment they are plugged in and run on a thermostat, so you switch them on and off at the wall socket and unplug when finished. This is normal for the category, not a fault. Always unplug after use and let the press cool before storing it upright.