The real decision here is how the tool reads the wall. Multi-sensor finders light up the whole width of a stud at once with no calibration; single-sensor scanners make you slide across to find each edge; cheap magnetic finders just locate the screws and nails. These six run from a $32 Fxvhojq 5-in-1 to the $155 Bosch wall detector.
Before you compare prices, understand the three ways these tools actually work, because that is what really separates them. A multi-sensor finder, like the Franklin ProSensor models, has a row of sensors that light up the whole width of a stud at once - you press it flat to the wall, hold the button, and it shows you the centre and both edges in a single read, with no calibration. A single-sensor scanner, the classic Zircon approach, has one sensor you slide across the wall until it beeps at each edge, then you mark the middle by eye. And a simple magnetic finder, the cheapest type of all, has no electronics at all - it just snaps onto the screws and nails already driven into the stud.
The six picks below run from a 32 dollar Fxvhojq 5-in-1 up to the 155 dollar Bosch detector, and they map onto that split. If you want the easiest, most confidence-inspiring read, a multi-sensor finder is worth the small premium. If you are happy to slide and confirm, a single-sensor Zircon does the job and often adds live-wire warning. On top of that, weigh up three extras that matter when you are about to drill: whether the tool warns you about live AC wires, whether it detects metal like pipes and nails, and how deep it can scan. Get those decisions right and the rest is detail.
Fxvhojq 5-in-1 Stud Finder
If you just want a capable stud finder for the least money, the Fxvhojq is the entry point. At 32 dollars it is the cheapest pick here, and it is a genuine 5-in-1: it finds wood and metal studs, joists, pipes and rebar, and live AC wires, all from one handheld unit. It works by sensing the change in density behind the wall to mark the centre of a stud, and an audio alarm beeps the moment it picks something up.
The LCD has a green backlight so you can still read it in a dim hallway or a poorly lit garage. For hanging a few shelves or a TV bracket a year, it covers the basics properly. The trade-offs at this price are a small review base of 66 ratings and the usual fiddliness of a budget single-sensor scanner, so move slowly and confirm each reading before you drill.
Franklin Sensors ProSensor M70
The ProSensor M70 is the value pick for most people because it removes the step where stud-finding usually goes wrong. Instead of sliding a single sensor across and guessing where the edges sit, its seven sensors light up the whole width of a stud at once, so you see the centre and both edges in a single read. There is no calibration to fuss over, and you can start scanning anywhere on the wall, even directly over a stud, without getting a false start.
One mode handles both wood and metal up to 38 mm deep, and with more than 1,200 ratings at 4.4 stars it has earned its reputation as a DIY favourite. The honest limit is that the M70 finds studs only - it has no live-wire warning - so if you are drilling near power points or switches, pair it with a separate AC check or one of the Zircon scanners below.
Zircon StudSensor e30
The StudSensor e30 is the classic single-sensor scanner - the one you slide across the wall until it lights up at each edge of the stud, then mark the middle between the two. It is the most familiar way to find a stud, and Zircon does it neatly: a SpotLite Pointer projects an arrow onto the wall so you mark the exact spot, and the pinch grip keeps the tool steady through the slide.
Its edge over the stud-only Franklins is WireWarning, which flags live, unshielded wiring up to 51 mm deep, a genuine safety plus when you are drilling near power. Two honest caveats temper it: it reads to only 19 mm deep, shallower than the multi-sensor picks, and it carries a small AU review base of 85, so think of it as a tidy, safety-minded single-sensor tool rather than the fastest finder here.
Franklin Sensors ProSensor M150
If the seven-sensor M70 sells you on the lights-up-the-whole-stud idea, the M150 is the wider, more capable version of the same tool. It packs nine sensors and 15 precision LEDs across a broader face, so it shows the centre and both edges at once and reveals the double studs and irregular framing common in older Australian homes that a narrow scanner would miss.
It auto-selects the right mode for changes in material or depth, so there is no toggling between standard and deep scan, and it reads to 38 mm. With more than 3,900 ratings at 4.5 stars it has both the highest rating and the biggest review base in this guide. The honest note is the same as the M70 - it is built to find studs and metal, not to act as a dedicated live-wire detector - and it costs noticeably more than the M70 for that wider face.
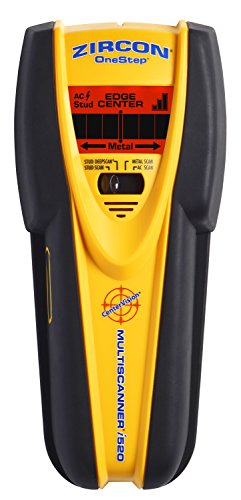
Zircon MultiScanner i520
The MultiScanner i520 is the do-everything single unit. It finds the centre of a stud rather than just the edges, then switches to dedicated modes that scan for metal and for live AC wires, so one tool covers the three things you usually want to know before you drill into a wall.
It reads to 38 mm deep and marks the centre three ways at once - an LCD readout, an audio tone and the SpotLite Pointer - while WireWarning flags live, unshielded wiring up to 51 mm down. That breadth is the appeal over a stud-only finder. The honest caveat is that, as a single-sensor centre-finder, it still wants a steady slide and a confirming second pass to fully trust the reading, and at 111 dollars it costs more than the faster multi-sensor Franklins that only find studs.
Bosch Multi-Material Detector
The Bosch UniversalDetect is the premium pick and the one to choose if you want a tool that maps what is behind the wall rather than simply beeping at a stud. It has three detection settings that find timber to 25 mm, live cables to 50 mm and metal all the way to 100 mm deep - far past the 38 mm reach of the scanners above - so it suits thicker walls and more serious work.
A full-colour touchscreen displays the results and on-screen tips, a step-by-step guide walks you through each scan, and a traffic-light LED ring around the marking hole tells you at a glance where it is safe to drill. The honest caveats are the price, which is hard to justify for occasional shelf-hanging, and a 4.0 rating that sits a touch below the Franklin and Zircon finders, so this is for people who detect often enough to value the depth and the screen.
How to choose between the three types
Start with how often you will use it and how much you trust your own hand. If you only hang the odd shelf and want the lowest fuss, a multi-sensor finder like the Franklin ProSensor M70 is the easiest to read correctly first time, because it shows the whole stud at once and never asks you to calibrate. If you are comfortable sliding a tool across the wall and confirming the edges, a single-sensor Zircon does the job for less and usually throws in a live-wire warning. And if budget is everything, a 5-in-1 like the Fxvhojq or even a basic magnetic finder will locate a stud well enough for light jobs.
Then weigh the safety extras. If you will ever drill near a power point, a light switch or a kitchen, a model with AC live-wire detection - the Zircon e30, the MultiScanner i520 or the Bosch - is worth choosing over a stud-only finder, because the cost of clipping a cable dwarfs the price difference. Metal detection matters if your walls hide pipes or conduit, and scan depth matters on thick or double-layer walls, where the Bosch's 100 mm reach pulls ahead of the 19 to 38 mm of the rest.
What the key specs actually mean
A few numbers and labels do most of the work when you compare these tools. The sensor count tells you which type you are buying: a seven or nine-sensor face like the Franklins reads the whole stud at once, while a single-sensor scanner reads one point at a time as you slide. Scan depth is how far behind the surface the tool can see - 19 mm on the Zircon e30, 38 mm on the multi-sensor finders and the i520, and a deep 100 mm on the Bosch - which matters most on tiled, rendered or double-layer walls.
AC wire detection is the safety number to look for if you drill near power, and it is on the Zircon e30, the MultiScanner i520 and the Bosch but not the stud-only Franklins. Metal detection flags pipes, conduit and nails. And calibration is a quiet but real convenience: the Franklin finders need none and let you start anywhere, whereas single-sensor scanners usually want a clear starting patch of wall to zero themselves. Read those together and any stud finder's spec sheet starts to make sense. If you are kitting out a toolkit, it pairs naturally with a good cordless drill for the holes you mark.
Frequently Asked Questions
Multi-sensor or single-sensor stud finder - which is better?
For ease and accuracy, multi-sensor wins. A multi-sensor finder like the Franklin ProSensor M70 has a row of sensors that light up the whole width of a stud at once, so you see the centre and both edges in one read with no calibration and no sliding. A single-sensor scanner like the Zircon StudSensor e30 reads one point at a time as you slide it across, which is cheaper and often adds live-wire warning, but it asks for a steadier hand and a confirming second pass. If you want the most foolproof read, choose multi-sensor; if you want lower cost or built-in wire detection, a single-sensor Zircon is fine.
Do I need a stud finder with live-wire detection?
If you will ever drill near a power point, a light switch or a kitchen, yes. AC live-wire detection flags hidden, unshielded cables before you drill into them, and the cost of clipping a live wire - both the danger and the repair - dwarfs the few dollars the feature adds. In this guide the Zircon StudSensor e30, the Zircon MultiScanner i520 and the Bosch detector all warn about live wires, while the Franklin ProSensor finders locate studs and metal only. For pure picture-hanging on an internal wall away from power it matters less, but it is cheap insurance worth having.
Are magnetic stud finders any good?
For simple jobs, yes, but they work differently from electronic finders. A magnetic stud finder has no electronics - it snaps onto the screws and nails already driven into the stud, so it points you at the fasteners rather than scanning the timber itself. That makes it cheap, battery-free and reliable for locating a stud on a standard plasterboard wall. The limits are that it cannot show stud edges or centres directly, cannot detect live wires, and struggles where there are few fasteners. For anything beyond light hanging, an electronic multi-sensor or single-sensor finder is the more capable tool.
How deep can a stud finder scan?
It depends on the model and what it is reading. Among the picks here, the Zircon StudSensor e30 reads studs to about 19 mm deep, the Franklin multi-sensor finders and the Zircon MultiScanner i520 reach roughly 38 mm, and the Bosch detector goes furthest at up to 100 mm for metal, 50 mm for live cables and 25 mm for timber. Deeper scanning matters most on thick walls, rendered or tiled surfaces, and double-layer plasterboard, where a shallow scanner can miss the stud entirely. For standard single-layer plasterboard, the 19 to 38 mm range covers nearly everything.
Why does my stud finder give false readings?
Usually it is one of a few things. Single-sensor scanners need a clear patch of wall to calibrate themselves, so starting directly over a stud, a pipe or a wire can throw the first read - which is exactly the problem the Franklin multi-sensor finders avoid, since they let you start anywhere. Dense wallpaper, fresh paint, textured surfaces, metal mesh and damp plaster can all confuse a scanner too. The fix is to scan slowly, take several passes from different directions, and confirm a suspected stud by checking the spacing, since wall studs usually sit a regular distance apart.
How far apart are wall studs in Australian homes?
In most Australian homes, timber wall studs are spaced at regular centres, commonly around 450 mm or 600 mm apart, though older houses and renovations vary. That regularity is a handy cross-check: once your stud finder locates one stud, you can measure across and expect the next at a similar interval, which helps you spot a false reading. Always confirm with the tool rather than relying on spacing alone, because doorways, windows and patched walls interrupt the pattern, and a good multi-sensor finder will reveal the double studs that often frame those openings.
Can a stud finder detect pipes and electrical wires?
Many can, but not all, so check the modes before you buy. Metal detection finds pipes, conduit and nails, and AC detection finds live electrical wiring. In this guide the Fxvhojq 5-in-1 and the Zircon MultiScanner i520 scan for both metal and live AC wires, the Zircon StudSensor e30 and the Bosch detector flag live wires, and the Bosch also maps metal to a deep 100 mm. The Franklin ProSensor finders concentrate on locating wood and metal studs rather than acting as dedicated wire detectors, so if pipes and cables are your main worry, pick a multi-mode scanner.