The real choice here is gauge and power. The gauge decides the job - 18-gauge brad nailers handle trim and light finishing, 16-gauge finish nailers tackle skirting and architrave, and a framing nailer drives structural timber. Then you choose pneumatic, which is cheaper but needs a compressor, or cordless, which costs more but drops the hose. These six run from a 157 dollar Craftsman brad nailer to a 647 dollar DeWalt cordless.
Gauge first, then power - the two questions that decide everything
Before you compare a single product, answer two questions and the whole category falls into place. First, what is the job? Gauge tells you that: an 18-gauge brad nailer is for trim, beading, picture rail and light cabinetry where you want a tiny, almost invisible hole; a 16-gauge finish nailer steps up for skirting, architrave and chunkier mouldings that need a firmer hold; and a framing nailer is a different animal entirely, driving long thick nails into structural timber, decking and wall frames. Second, pneumatic or cordless? A pneumatic gun is cheaper but only works with an air compressor and hose, while a cordless gun costs more but frees you from the compressor completely. Get the gauge right for your job and pick the power source that suits how you work, and the rest is detail.
The six picks below run from a 157 dollar Craftsman brad nailer up to a 647 dollar DeWalt cordless, and they map cleanly onto those questions. There is an honest truth worth stating up front: the genuine-nailer pool in Australia starts at around 157 dollars, and there is no credible sub-150 dollar gun worth owning, so this is a mid-to-premium lineup rather than a bargain-bin one. Most homes are best served by an 18-gauge brad nailer, a 16-gauge finish nailer covers heavier trim, and only buy a framing nailer if you genuinely do structural work - match the gun to the job and you will not overspend.
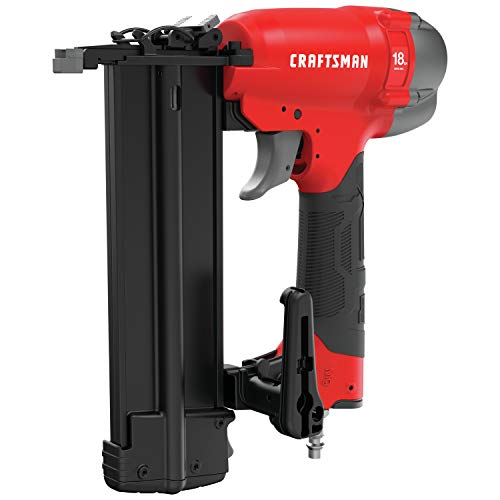
Craftsman 18GA Pneumatic Brad Nailer
If you want one nail gun for general home jobs and the smallest possible outlay, the Craftsman is the entry point. At around 157 dollars it is the cheapest genuine nailer here, and as an 18-gauge brad nailer it covers the work most people actually do - trim, beading, picture rail, small mouldings and light cabinetry - without splitting thin timber the way a heavier gun would.
The oil-free motor keeps maintenance low, tool-free depth adjustment lets you sink the brad heads just below the surface for a clean fill, and tool-free jam release clears the occasional misfire fast. It comes in a carrying case so the gun and accessories stay together. The honest trade-off is that it is pneumatic, so it only runs with an air compressor and hose you supply separately - if you do not already own a compressor, factor that into the cost.
The Metabo HPT is the pick when the job moves up from fine trim to skirting boards, architrave, chair rail and cabinetry. The step from 18-gauge to 16-gauge means a slightly thicker nail and a stronger hold, while the hole stays small enough to fill and paint over neatly - exactly what you want for finish carpentry that has to last.
It drives 16-gauge nails from 1 inch up to 2-1/2 inches, so it spans light trim through to heavier mouldings, and a switch lets you pick careful sequential firing or faster bump firing for long runs. At 3.7 lbs it is light and well balanced, and a tool-free depth dial plus an integrated air-duster button make it easy to live with on a long day. The honest caveat is the same as any pneumatic - you need a compressor and hose - and 16-gauge is slightly heavy for the most delicate beading, where an 18-gauge brad sits flatter.
Ryobi 18V ONE+ Cordless Brad Nailer
The Ryobi is the value way to go cordless, and an obvious choice if you already own Ryobi ONE+ tools because it shares the same 18V batteries. It does the same 18-gauge brad work as the Craftsman - trim, beading and light finishing - but drops the compressor and hose entirely, so you just clip in a battery and move freely around a room or up a ladder.
You can select single sequential firing for precise placement or contact actuation for production speed up to 60 nails per minute, and tool-free depth adjustment sets the heads cleanly. It is the bridge from pneumatic to cordless without a premium price. The honest note is that it is sold tool-only, so you will need a Ryobi battery and charger if you do not already have them, and a cordless gun costs more up front than a comparable pneumatic - you are paying to lose the hose.
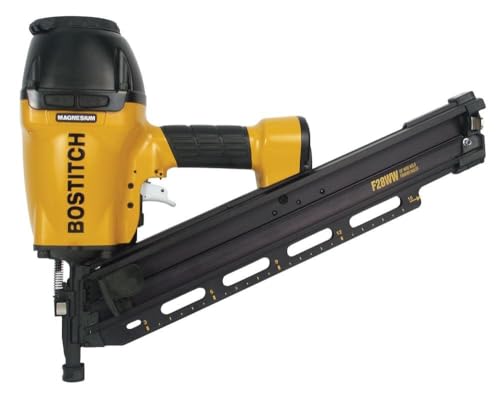
Bostitch F28WW Pneumatic Framing Nailer
The Bostitch is the odd one out, and deliberately so - it is a framing nailer for an entirely different class of work. Where the brad and finish nailers handle trim, this drives long, thick nails from 2 inches up to 3-1/2 inches into wall frames, studs, decking, subfloor and fencing. That is structural fastening no finishing gun can do.
The magnesium housing keeps it tough enough for repetitive driving while staying manageable to swing, and it is built in the United States with a long-standing reputation for durability. The honest caveats are scope and air supply: it is complete overkill for trim and will blow straight through delicate mouldings, so only buy it if you genuinely do framing - and as a pneumatic it needs a compressor and hose, with framing guns in particular wanting a compressor that delivers enough air to keep pace.
Milwaukee M18 FUEL Cordless Brad Nailer
The Milwaukee is the cordless brad nailer to reach for if you are already in the M18 battery system, since it runs on the same packs as the rest of your kit. It is an 18-gauge gun aimed at trim, beading and light cabinetry, but built to a professional standard with a brushless FUEL motor and a refined Gen II design that drives consistently and stands up to heavy daily use.
With no compressor, hose or gas cartridge to manage, you just clip in a battery, and the compact body suits awkward spots and overhead work where an air line would get in the way. The honest trade-offs are that it carries a smaller review base than the cheaper guns here, and like all cordless brad nailers it costs more than a pneumatic of the same gauge - the premium buys freedom from the compressor and a place in the Milwaukee ecosystem.
DeWalt 20V MAX Cordless Brad Nailer Kit
The DeWalt is the premium standout and the most-reviewed nailer in this guide by a wide margin, which makes it the reassuring choice if you want a proven cordless brad gun. Running entirely on battery power, it eliminates the compressor, hose and gas cartridge a pneumatic needs, so you can grab it and work anywhere, while the brushless motor stretches runtime and the micro nose sharpens your line of sight for accurate placement on fine trim.
It is genuinely thoughtful in use, with tool-free depth adjustment, tool-free jam release, a low-nail lockout that prevents dry firing, multi-function LED lights and a selectable trigger for sequential or contact firing - and it ships as a kit with a battery and charger. The honest caveat is price: it is the dearest gun here, and it is still an 18-gauge brad nailer built for trim and finishing rather than heavier 16-gauge or framing work, so you are paying for cordless convenience, build quality and that enormous happy owner base.
How to match the nail gun to your job
The biggest mistake is buying the wrong gauge for the work in front of you. If you are doing trim, beading, picture rail or light cabinetry, an 18-gauge brad nailer is the right tool - it leaves a tiny hole and will not split thin timber. If you are running skirting boards, architrave or heavier mouldings, step up to a 16-gauge finish nailer for a firmer hold that still fills cleanly. And if any part of your project is structural - wall frames, decking, subfloor - that is framing work and needs a framing nailer, which no amount of brad nailing can substitute for. One gun rarely covers all three jobs well, so be honest about what you are actually building.
The second decision is pneumatic versus cordless. A pneumatic gun is cheaper to buy but only works tethered to an air compressor and hose, which means a bigger overall outlay and less freedom to move if you do not already own a compressor. A cordless gun costs more up front but needs nothing but a charged battery, making it far quicker to pick up for a small job and much easier to use on a ladder, overhead or away from a power point. If you already own a compressor, pneumatic stretches your money further; if you value grab-and-go convenience or already own a battery platform, cordless is worth the premium.
What the key specs mean
A handful of numbers do most of the work when you compare nailers. Gauge is the thickness of the nail - counter-intuitively, a higher gauge number means a thinner nail, so 18-gauge is finer than 16-gauge, which is why 18-gauge brads suit delicate trim and 16-gauge finish nails suit heavier skirting and architrave. Nail length tells you how deep the gun can fasten, which matters as you move from thin mouldings to thicker timber; a finish nailer spanning 1 to 2-1/2 inches is flexible, while a framing nailer reaches 3-1/2 inches for structural holds.
Firing mode is the other detail worth understanding. Sequential firing means you press the nose down and then pull the trigger for each nail, which is precise and the safer default; contact or bump firing lets you hold the trigger and bounce the nose along for speed on long runs. Depth-of-drive adjustment sets how far the nail sinks, so you can leave heads flush or just below the surface ready for filler. Read gauge, nail length, power source and firing mode together and any nailer product page starts to make sense.
Frequently Asked Questions
What is the difference between an 18-gauge and a 16-gauge nail gun?
It comes down to nail thickness and the job. Gauge measures the nail, and a higher number means a thinner nail, so an 18-gauge brad is finer than a 16-gauge finish nail. The thinner 18-gauge brad leaves a tiny, nearly invisible hole and will not split delicate timber, which makes it ideal for trim, beading, picture rail and light cabinetry. The 16-gauge finish nail is a touch thicker and holds more firmly, so it suits skirting boards, architrave and heavier mouldings while still leaving a small hole you can fill and paint. If you only buy one gun for general home use, an 18-gauge brad nailer is the more versatile starting point.
Pneumatic or cordless nail gun - which should I choose?
It depends on whether you value lower cost or convenience. A pneumatic nail gun is cheaper to buy but only works connected to an air compressor and hose, so the real cost includes the compressor and you are tethered to an air line as you work. A cordless nail gun costs more up front but runs on a battery with no compressor, hose or gas cartridge, which makes it far quicker to grab for a quick job and much easier to use up a ladder or away from power. If you already own a compressor, pneumatic stretches your budget; if you want grab-and-go freedom or already own a battery platform like Ryobi, Milwaukee or DeWalt, cordless is worth the premium.
Do I need an air compressor for a nail gun?
Only for a pneumatic gun, not a cordless one. The pneumatic nailers here - the Craftsman, Metabo HPT and Bostitch - all run on compressed air, so they need an air compressor and hose you supply separately, and a framing nailer in particular wants a compressor that delivers enough air to keep up with driving big nails. The cordless guns - the Ryobi, Milwaukee and DeWalt - need none of that; they run entirely on a battery, which is exactly what you are paying the higher price for. So before buying a pneumatic gun, check whether you already own a suitable compressor, because that extra cost can close the gap to a cordless tool.
Which nail gun is best for skirting boards and architrave?
A 16-gauge finish nailer is the sweet spot for skirting and architrave. These boards are bigger and need a firmer hold than fine beading, and the slightly thicker 16-gauge nail grips well while still leaving a small hole you can fill and paint over. The Metabo HPT 16-gauge finish nailer here drives nails from 1 inch up to 2-1/2 inches, which comfortably covers skirting, architrave, chair rail and chunkier mouldings. You can fasten light architrave with an 18-gauge brad nailer in a pinch, but for skirting and heavier trim the extra hold of 16-gauge is the more reliable choice.
Which nail gun is best for trim and light finishing work?
An 18-gauge brad nailer is the right tool for trim and fine finishing. The thin 18-gauge brad leaves a tiny hole that disappears with a dab of filler, and it will not split delicate timber, so it is ideal for beading, picture rail, small mouldings, edging and light cabinetry. In this guide the Craftsman, Ryobi, Milwaukee and DeWalt are all 18-gauge brad nailers - the Craftsman is the cheapest pneumatic option, while the Ryobi, Milwaukee and DeWalt are cordless if you would rather skip the compressor. For the most delicate trim, an 18-gauge brad sits flatter and cleaner than a heavier 16-gauge finish nail.
What is the difference between a framing nailer and a finishing nailer?
They do completely different jobs and are not interchangeable. A framing nailer, like the Bostitch here, drives long, thick nails from 2 inches up to 3-1/2 inches into structural timber - wall frames, studs, decking, subfloor and fencing - where strength matters more than appearance. A finishing nailer, whether 16-gauge or 18-gauge, drives much smaller nails for trim, skirting, architrave and cabinetry, leaving a tiny hole you can fill so the fastener disappears. A framing nailer would blow straight through delicate mouldings, and a finish nailer cannot hold structural timber, so you choose based on whether the work is building a frame or finishing a surface.
How do I use a nail gun safely?
A few sensible habits cover most of it. Always wear eye protection, because nails and debris can fly, and never point the gun at yourself or anyone else, even when you think it is not loaded. Understand your firing mode: sequential firing, where you press the nose down then pull the trigger for each nail, is the safer default for careful work, while contact or bump firing is faster but easier to misfire, so save it for long runs once you are confident. Keep your spare hand clear of where the nail will exit, disconnect the air hose or remove the battery before clearing a jam or leaving the tool, and let the depth adjustment - not extra force - set how deep each nail sinks.